Wireless earbuds have become increasingly popular, and Apple’s AirPods are among the most popular options. Pairing AirPods with a Dell laptop is a simple process that allows you to enjoy music, podcasts, and phone calls wirelessly. In this guide, we’ll walk you through the steps to connect your AirPods to your Dell laptop.
To begin, ensure that your Dell laptop has Bluetooth connectivity. Next, put your AirPods into pairing mode by pressing and holding the button on the back of the case. Once the LED light on the case starts flashing, it’s ready to pair with your laptop.
Now it’s time to pair your AirPods with your Dell laptop. Open the Bluetooth settings on your laptop and select “Add Bluetooth or other devices.” Choose “Bluetooth” and wait for your laptop to detect your AirPods. Once your AirPods appear on the list of available devices, click on them to connect. If prompted, enter the pairing code “0000” to complete the connection process.
Pairing AirPods with Dell Laptop
Do you want to pair AirPods with your Dell laptop? No worries, we will guide you through the process of pairing AirPods to Dell laptops. First, make sure your AirPods are fully charged. After that, follow these simple steps
Step 1: Open the start menu and type settings. Select the app once it appears, or press a short key from the keyboard Windows + I.
Step 2: Choose devices from the settings menu.
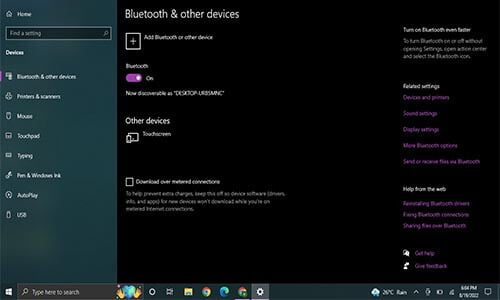
Step 3: If you see the “Bluetooth & other devices” option, that means your laptop has a built-in Bluetooth functionality. Otherwise, your laptop does not have it and may use Bluetooth USB dongles. Click on the Bluetooth OFF toggle button if it is not flipped to ON.
Step 4: Select Add “Bluetooth & Other devices”.
Step 5: Add Bluetooth or other devices will pop up. Select Bluetooth.
Step 6: Grab your AirPods or AirPods Pro and hold down the circular button for a few seconds. On holding the circular button the charging light on the AirPods will begin pulsing white.
Step 7: Look at the laptop and “In Add, a device menu”, select your device, and click on Connect. You’ll get a notification, “Your device is ready to go!”
Here you go, your airports have connected with the Dell laptop.
| Note The pairing information will be stored on the laptop once you pair your AirPods. So it will automatically try to connect to the matched laptop when its power is on. |
Here is the video of pairing Airpods with Dell laptop
Connecting AirPods 2 to Dell Laptop
When it comes to sound quality AirPods 2 is one of a kind and connecting this to your laptop is not a difficult task at all. Here is how you can do it.
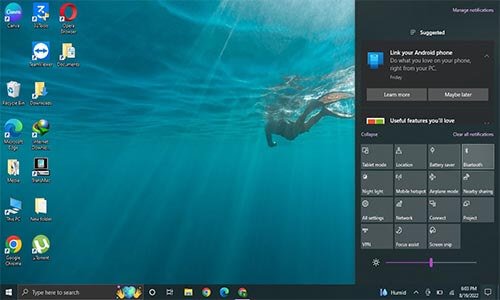
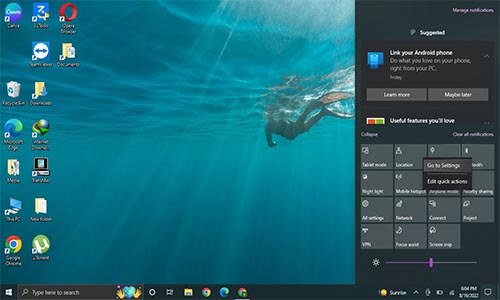
- Go to the action center on your laptop or PC.

- Now click on Bluetooth and then choose settings.

- Turn the Bluetooth on.

- Select add devices and simultaneously open your AirPods 2 case and hold on to the button to activate its pairing mode.

- Wait till the LED light starts blinking which notifies that the pairing mode is activated.
- Now on your laptop AirPods 2 must be available under the Available Bluetooth devices or Discovered devices, connect it and there we go it’s done.
Connecting AirPods to Dell Laptop Windows 7
First of all, let me make it clear that yes you can connect the AirPods to the Dell laptop even if you are using Windows 7 Os. Now let’s see how to do that
- First press the button on the AirPods’ case to activate its pairing mode.
- Now go to the control panel.
- Now go to Hardware and Sounds.
- Choose Devices and printers.
- Click on Add a Device.
- Select your AirPods under available devices and there you go it’s done.
Read More: How To Unlock A Dell Inspiron Laptop Without The Password?
Reconnecting AirPods with Dell Laptop
Your AirPods will save Bluetooth information with the specific name once you pair it. If they do not connect with your laptop, that means you have not paired your AirPods with the laptop.
Step 1 Open the start menu and type settings or press Windows + I from the keyboard.
Step 2 Select “Devices” and scroll down to the audio section. Select your AirPods, and click on the connect button. Your AirPods will start working now.
Disconnecting AirPods from Dell Laptop
You can easily disconnect your AirPods from the laptop. For doing this, follow these three easy steps
Step 1 Open the start menu and type settings or press Windows + I from the keyboard.
Step 2 Look for the device heading and click on it in the settings.
Step 3 Scroll down to the audio section. Click on your AirPods and click on “Remove device”. Your AirPods will disconnect from your Dell laptop.
Conclusion
In conclusion, pairing your AirPods with a Dell laptop is a quick and simple process that can enhance your audio experience while using your laptop. With just a few steps, you can connect your AirPods wirelessly and enjoy your favorite music, take calls, or listen to podcasts without any hassle. By following the steps outlined in this guide, you can easily pair your AirPods with your Dell laptop and start enjoying the benefits of a wireless audio connection.
Frequently Asked Questions (FAQs)
Why won’t my AirPods connect to my Dell laptop?
The main reason can be that your device’s Bluetooth feature needs a refresh. Just turn off the AirPods and Bluetooth from your laptop. Wait for some time and now turn the laptop’s Bluetooth and AirPods on again.
How to connect AirPods to Dell laptop with Windows 10?
Hold the button on the AirPods until the white light shows up. Now go to Add a device option in your laptop where the AirPods must be visible already, and connect it to these.
