
Windows are widely used and it’s an ideal choice for the operating systems in the market. If you are also a Windows user and thinking of how to share documents with friends and family? The screenshot is a genuinely simple and easy way to do so.
Taking a screenshot on Windows 10 is similar to the process used for Windows 7 and Windows 8. You can effortlessly capture a screen on any laptop using the print screen key (PrtScn).
However, there are some pre-installed functions available in Windows like the snipping tool, for capturing screenshots. You can also take help from third-party software, for capturing the screen. To know about all those methods in detail, make sure to read this article till the last line.
6 Methods to Take A Screenshot on Windows 10 Laptop
Windows operating system users enjoy a lot of opportunities and adaptability. Windows 10 has impressive features, especially windows 10, in the new update. It allows you to share, create, send mail, and browse the web much more easily.
A screenshot helps to save and share information with others without sharing the full overflow for security concerns. Capturing a screen can save a lot of time-sharing information. Here I have listed all the significant methods to capture screens on Windows 10 laptops.
Read More How To Take A Screenshot On A Dell Laptop?
1. Screenshot of The Whole Screen Using (Print Screen)
To capture your full screen, press the print screen on your keyboard (sometimes labeled as Prt Sc). Your screenshot will not be saved, but it will be saved in your clipboard. Open an image editor like paint and adobe photoshop and paste in it by pressing Ctrl + V.
If your print screen (PrtSc) button is not active, follow these steps, and activate your Print Screen (PrtSc) button from the setting.
Step1: Open the Start menu and type settings.
Step2: Go to Ease of Access and click on it.
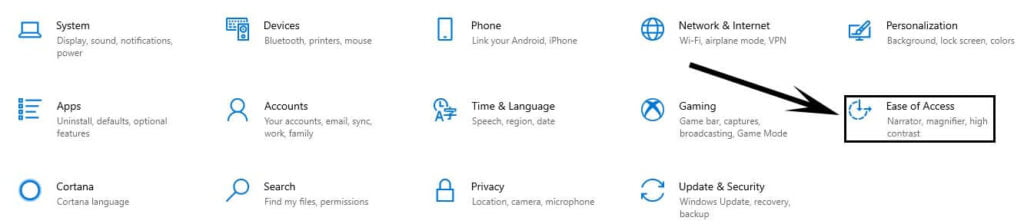
Step3: Scroll down Ease of Access and find a keyboard, then click on the use Print Screen (PrtSc) button to open screen snipping, you might need to restart your laptop.

2. Screenshot of The Whole Screen Using (Windows + Print Screen)
Firstly, press the Function key + Print Screen fn + PrtSc on the keyboard. The screenshot is stored in your clipboard. You have to use it anywhere you want to use or paste it into your graphic editors like windows paint or adobe photoshop. But it will be automatically saved in your picture screenshot folder.
Open the picture folder under “This PC” and now find the “Screenshot” folder. You will see all your screenshots are in this folder.
3. Taking a Screenshot of a Specific Area
With the new update of Windows 10, Microsoft has launched this feature to take a screenshot of the screen’s particular area. If you want to access this new feature in Windows 10, update your windows and follow these steps:
Step1: Press the Windows + Shift + S combo command.
Step2: An overlay Gray screen will appear, and the cursor will change with the plus. Select the area which you want to capture. By default, a screenshot will be copied to your clipboard, and a message will appear on the right side, click on it.
It will open a snip & sketch editor, edit your capture screenshot and save your file at any location where you want to save it.
Step3: The selected area will be saved in your clipboard, use it in any graphic editor or document file by pressing Ctrl + V keys.
4. Screenshot Using Snipping Tool Widget

This tool has been a part of Windows for a long time, and it was first introduced in Windows VistaSAA. Follow these steps for using the snipping tool widget.
Step1: Click on the start menu and type the snipping tool in the search bar.
Step2: Click on the snipping tool and open it.
Step3: Click on the new in the snipping tool, a white overlay screen will appear, and the cursor will change with the plus sign, then capture your screen.
Windows 10 has a new option in the snipping tool, “Delay” you can set the timer for the screenshot from 0-5 seconds. It helps the users a lot to select the number of seconds to capture the screen. In the “Mode” you have more options to choose from.
- Free-form snip- it allows you to select a specific area of the screen.
- Windows snip– it takes the screenshot of whole screen windows.
- Full-screen snip– it takes a screenshot of the whole screen.
Step4: Select the area for capturing the screen from the mouse.
When you release your mouse snipping tool will show your selected area which you have captured. Here you have different options like send snip, write over the snip, and others.
5. Newly Introduced Game Bar

Microsoft Windows is introducing new updates day by day to suit the latest trends in technology. Microsoft, in its latest update, has added a new shortcut command capturing screen in gaming mode you can also record your screen in this new amazing feature.
Step1: Press Windows + G to call up the game bar.
Step2: From here, you can capture and even record your screen with voice.
Your pictures and videos will be automatically saved in the pictures and videos capture folder under “This PC.”
6. Free Screenshot Software for Windows
Windows 10 has itself handy built-in screenshot tools. But you can use the different free screenshot software that has some more features than the windows screenshot tool, and they are available on the internet market.
Here I recommend some screenshot software that is very cool to use Jing (TechSmith) and picpick, go to its download page and click download and follow its installation instructions.
Conclusion
So, in this article, I have discussed all possible ways for capturing screenshots on Windows 10. I’m sure that this explanation will help you a lot to capture a screenshot on a Windows 10 laptop using the built-in functions, or with the help of Third-party Software.
Frequently Asked Question (FAQs)
What is the shortcut key for taking screenshots on windows 10?
Usually, the shortcut key used for taking screenshots is the Print Screen key (PrtScn) available in the upper right corner. However, in some cases, this key is used along with a Windows key too.
Why can’t I take a screenshot on windows 10?
There can be multiple reasons why the laptop is not capturing the screen. However, most commonly when the Print Screen key is disabled because of the F lock key then you won’t be able to capture a screenshot on the laptop.
