
Nowadays, the quality of the laptop display has elevated to another level. Anyone can easily adjust the brightness automatically with these advanced laptop screens. Though these screens are much brighter than the screens of the old laptops, some people still want their screen to be brighter than max.
The easiest way to make your screen brighter than max is the use of other third-party apps, reconciliation brightness, etc.
However, to make the most out of these ways, you need to go into minute details and follow the steps carefully. Below are the details of everything you need to know about screen brightness issues.
Is It Possible To Make Laptop Screen Brighter Than Max (Let’s Find Out)
Each display has its most powerful brightness abilities. Even though your ordinary brilliance settings will not permit you to go past that, some different settings/applications will permit you to make changes in the display to make it look brighter.
4 Easy Ways To Make Your screen Brighter than Max
There are many ways to improve your screen brightness and make it brighter than max. However, these three are the proven and most authentic ones.
- Using Third-Party apps.
- Through Adjusting Display Brightness.
- Using Keyboard.
- Color Calibration Wizard.
Read More: How To Fix Acer Laptop Black Screen?
Using Third-Party Apps
On the off chance that the brightness slider in the Windows Settings or the on-screen menu of your screen can’t turn the brightness of your screen to the extreme. At that point, you can consider utilizing third-party applications. These third-party applications are known to offer much higher brightness.
Beginning with Windows laptops, on the off chance that you have a Windows machine, you can go with the F.Lux application to increase the brightness of your laptop screen. It won’t only help you in increasing the brightness but will change and adjust your screen’s brightness according to the time too.
Other applications include CareUEyes, Brightness Slider, and Dimmer. People with a Mac laptop can go with the Brightness Slider application, which offers similar usefulness.
Through Adjusting Display Brightness
Before evaluating anything more, you first need to guarantee that the default brightness settings of the screen are set to optimal. One simple method is to set the brightness to maximum using the keyboard.
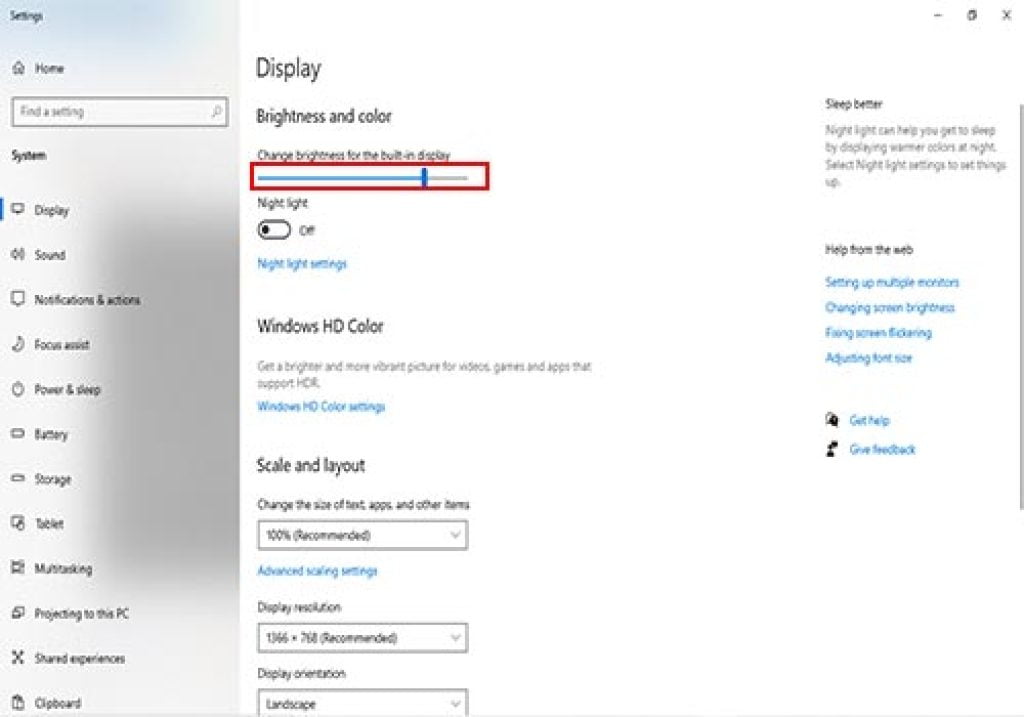
If you can’t find the brightness settings this way, then, at that point, you can likewise consider choosing the brightness settings in Windows Settings as displayed here
- In the first place, press Windows Key + I on your console and open Windows Settings.
- Open the Display area from the left of the screen. You will see the brightness slider below the color and Brightness segment.
- Drag this slider to the super right to ensure that you are at present utilizing the maximum brightness of your screen.
Using Keyboard
With PCs, the screen is built into advanced technological machines. However, you can not similarly adjust the brightness as you do with other screens. The solution? Put the Brightness keys on your keyboard. Issue settled.
You’ll, as a rule, track down these keys on, underneath, or over your Functions keys, e.g., F1, F2, up to F12. Search for a symbol looking like a sun. They are generally assigned as F1 and F2. To diminish your screen, press F1. To light up your screen, press F2. Guarantee that your screen has been set to max or changed in like manner.
| Note You can adjust your brightness this way on a laptop with Windows 10. |
Color Calibration Wizard for Windows 10
To move past the maximum screen brightness, look no farther than your laptop’s Color Calibration Wizard. This wizard will enable you to change the color and brightness of the laptop screen. Users don’t need any installation and utilize this choice if they have Windows 10 – PC or work area.
Here’s how you do it
- Start by opening your Windows Start menu. Click on the Windows logo on your screen bottom-left corner, along the taskbar, or you can get it by pressing the Windows key.
- Open your Settings in your Windows Start menu. It’s the gear icon that you’ll find in the bottom left corner of the menu.
- Click System in your PC Settings.
- Click Display present on the left. Open the Advanced display settings on the Display page. You’ll find it under “Multiple Displays.”
- Then, for Display 1, go to adapter properties through the hyperlink, and a pop-up window will open.
- Open the Color Management tab on this window. Another pop-up window will show up.
- Presently, click on the Advanced tab at the top. Click Calibrate Display under “Display Calibration.”
- Change the screen settings as you see fit.
Read More: Why Are Gaming Laptops So Expensive?
Conclusion
There are multiple situations where you might need to increase the screen brightness. Whether it is the radiant outdoors or simply brilliant lights in your room, ensuring that you utilize an adequately brilliant screen display is profoundly significant. Thus, I have presented a complete guide on the best way to make a laptop screen more brilliant than max.
Frequently Asked Questions (FAQs)
How do I make my MacBook Pro screen brighter than max?
For Macbook Pro, you can achieve a brighter screen by using the brightness slider application or by calibration wizard.
Why is my laptop brightness low even on max?
This is mainly due to two reasons. There is a high chance that the operating system’s display drivers aren’t updated or possibly the LCD inverter doesn’t have enough voltages.
